Introduction
The capacity to share data effectively among devices is crucial in IoT (Internet of Things) and sensor-based applications. Enter ESP-NOW, a powerful protocol that enables you to easily communicate sensor data between ESP32 microcontrollers when combined with MicroPython. In addition to streamlining data interchange, this powerful combination creates a myriad of opportunities for real-time communication within your projects. We set out on a mission to see how ESP-NOW when seamlessly connected with MicroPython, can transform how you communicate sensor data
If you want to see a demo of this project then please see the below video or watch it on my YouTube channel. I highly suggest that you watch the video first before reading this accompanying blog.
Sending Sensor Data in ESP-NOW
One practical application of ESP-NOW is the ability to send real-time sensor data between ESP32/ESP8266 in the absence of a WiFi network. If we are building a weather station project then we could place our sensor away from our home and we could still retrieve the readings through the ESP-NOW wireless protocol.
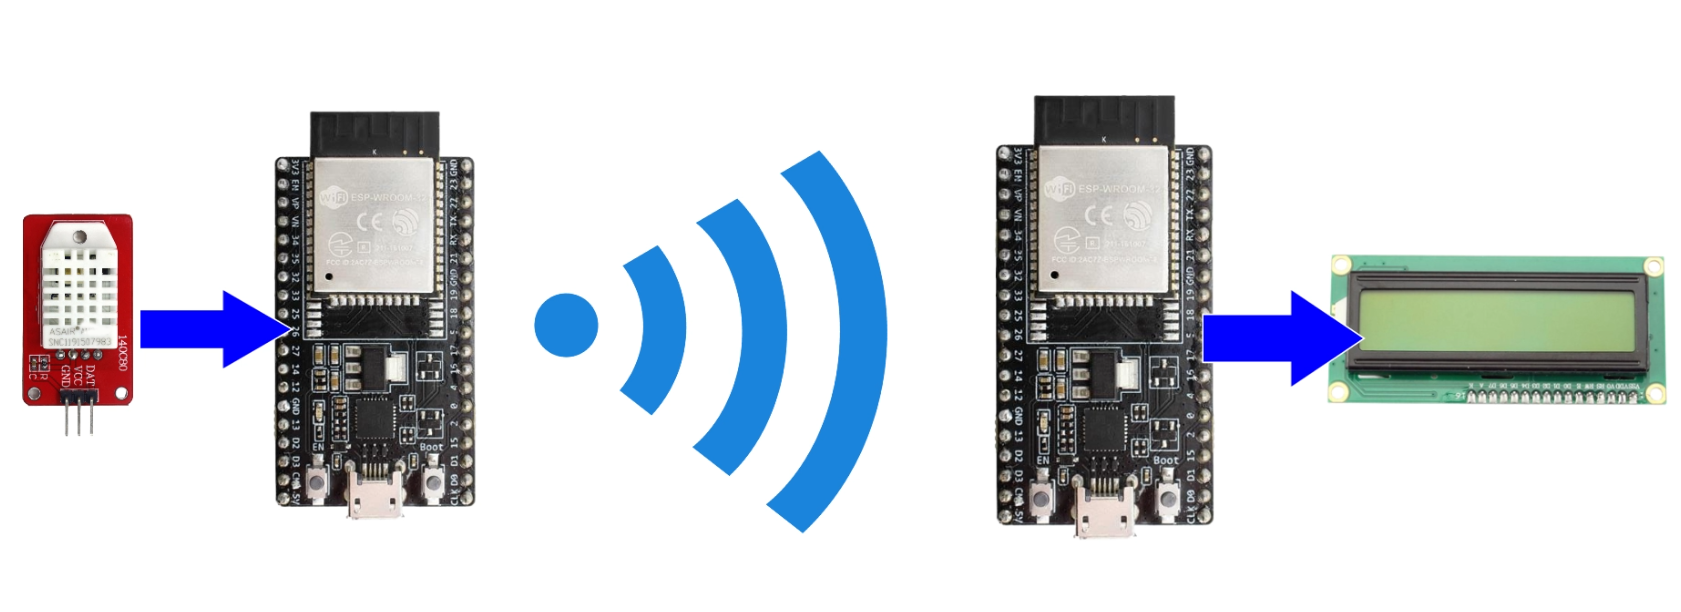
In this post, I will try to answer the following questions:
- How to retrieve sensor readings from a DHT22/DHT11 through ESP-NOW in MicroPython?
- How to get notified of movement when using a PIR Motion/Infrared IR Sensor?
- How to process multiple sensor readings in MicroPython and send the data through ESP-NOW?
These are just sample sensors but the logic here could be applied to another setup.
ESP-NOW in MicroPython
This series of posts is my own learner’s guide on how to get started with using ESP-NOW in MicroPython. I have documented my learnings on how to use this awesome wireless protocol in my own IoT projects. There are not enough beginner tutorials currently on how to explore this topic on the internet so I have decided to write my own. I hope that I could help beginners about this subject but at the same time I would like feedback from veteran MicroPython programmers on how to improve these posts.
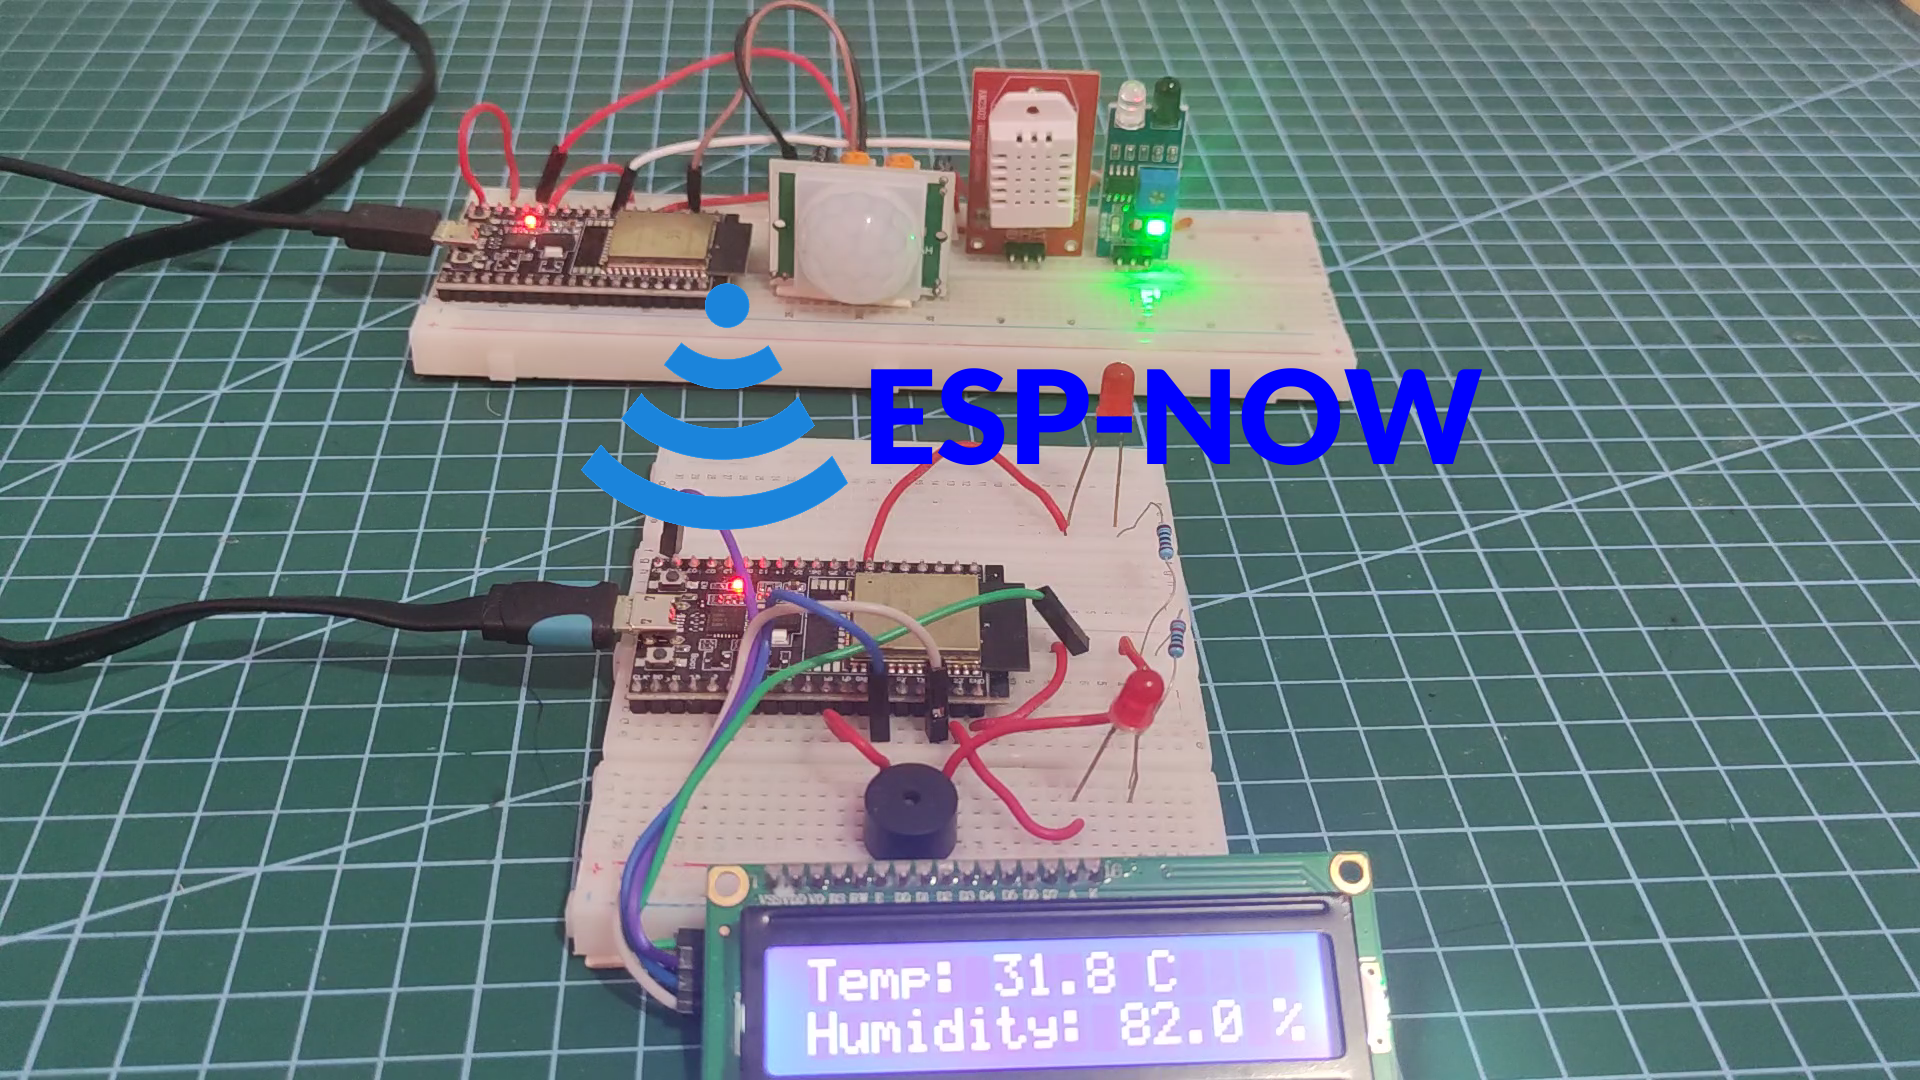
Below are the topics that I will cover in this series:
- Exploring ESP-NOW in MicroPython: A Learner’s Guide
- Discovering ESP-Now in MicroPython with Asyncio
- Sending sensor data through ESP-NOW in MicroPython
- Integrating ESP-NOW with MicroPython and WiFi
In this post, I am going to show you how I sent my sensor data through ESP-NOW using MicroPython. I will be dealing with multiple sensors so we would be needing asynchronous programming to make it work.
Prerequisites
You should have read the first two parts of this series as I won’t be discussing so much about how to set up ESP-NOW in MicroPython in this post. Also, the topic of how to use asyncio was discussed there so I won’t be explaining what a coroutine, event loop, and task are.
Download the latest firmware of MicroPython for your ESP32/ESP8266 devices which has support for ESP-NOW. I have used the Thonny IDE in developing this project so you should be familiar with how to use it.
Related Content:
MicroPython Development Using Thonny IDE
MicroPython using VSCode PyMakr on ESP32/ESP8266
Parts/Components Required
The following are the components used in this project.
- ESP32 – Amazon | AliExpress
- or ESP8266 – Amazon | AliExpress
- DHT22 – Amazon | AliExpress
- DHT11 – Amazon | AliExpress
- PIR Motion Sensor – Amazon | AliExpress
- Infrared Sensor – Amazon | AliExpress
- LCD 1602 – Amazon | AliExpress
- Resistors – Amazon | AliExpress
- LED Kit – Amazon | AliExpress
- Potentiometer – Amazon | AliExpress
- Breadboard – Amazon | AliExpress
- Connecting Wires – Amazon | AliExpress
- Arduino/Raspberry Pi Kit – Amazon | AliExpress
Note: We need a minimum of two ESP32 or ESP8266 to test out ESP-NOW.
Disclosure: These are affiliate links and I will earn small commissions to support my site when you buy through these links.

PCBWay is a manufacturer specializing in PCB prototyping, low-volume production, and PCB Assembly service all under one roof. So if you want to make a PCB for your electronic project then PCBWay is a great choice for you.
donskytech
Schematic/Wiring
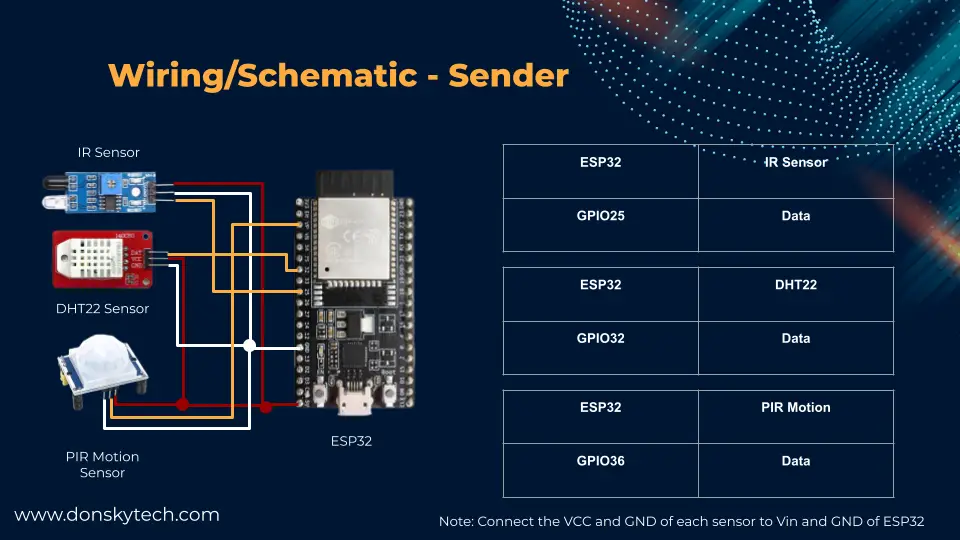
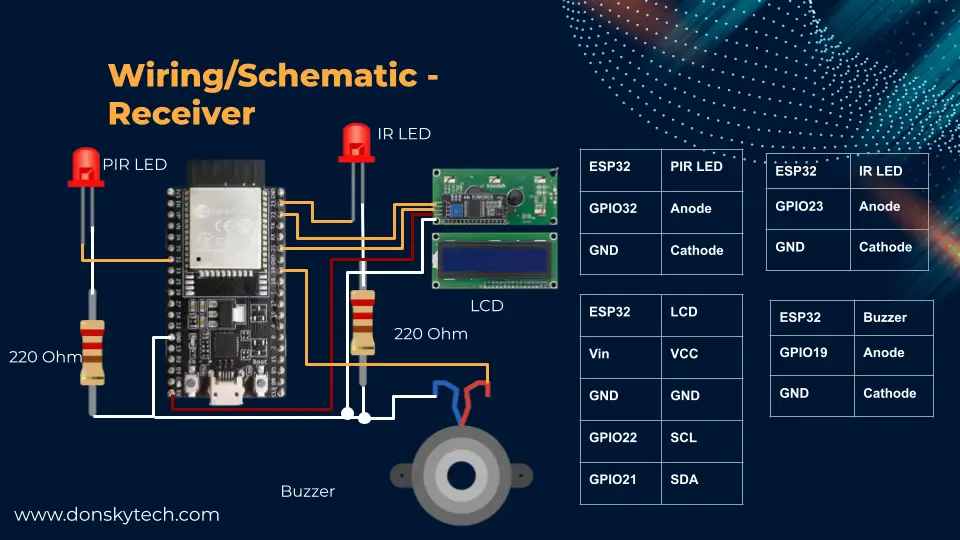
The following are the wiring and the schematic for the components that are used in this project.
Below is the connection for the ESP32 where our PIR motion, Infrared, and DHT22 sensors are connected.
The receiver on the other hand has the following wiring.
Code
The code for this project is available on my GitHub repository. You can download the project folder by following this How to download a GitHub folder?
This project contains only two files, namely:
The async_sensor_reader.py is our MicroPython file that reads the values of our sensors (DHT22/PIR Motion/Infrared) while the async_sensor_receiver.py is the one that receives the ESP-NOW messages.
Let us go through what each file does.
Libraries used in this project
We only need to install the following library micropython-i2c-lcd to drive our I2C LCD and you can install this using mpremote. mpremote is a small command line interface (CLI) library that we can use to interact with our MicroPython device.
If you have not installed mpremote then do so by doing the following.
pip install mpremoteAfter installing we can install the library using the below command.
mpremote mip install micropython-i2c-lcdIf you encounter an error while executing the above command then try the below command.
mpremote mip install github:brainelectronics/micropython-i2c-lcdasync_sensor_reader.py
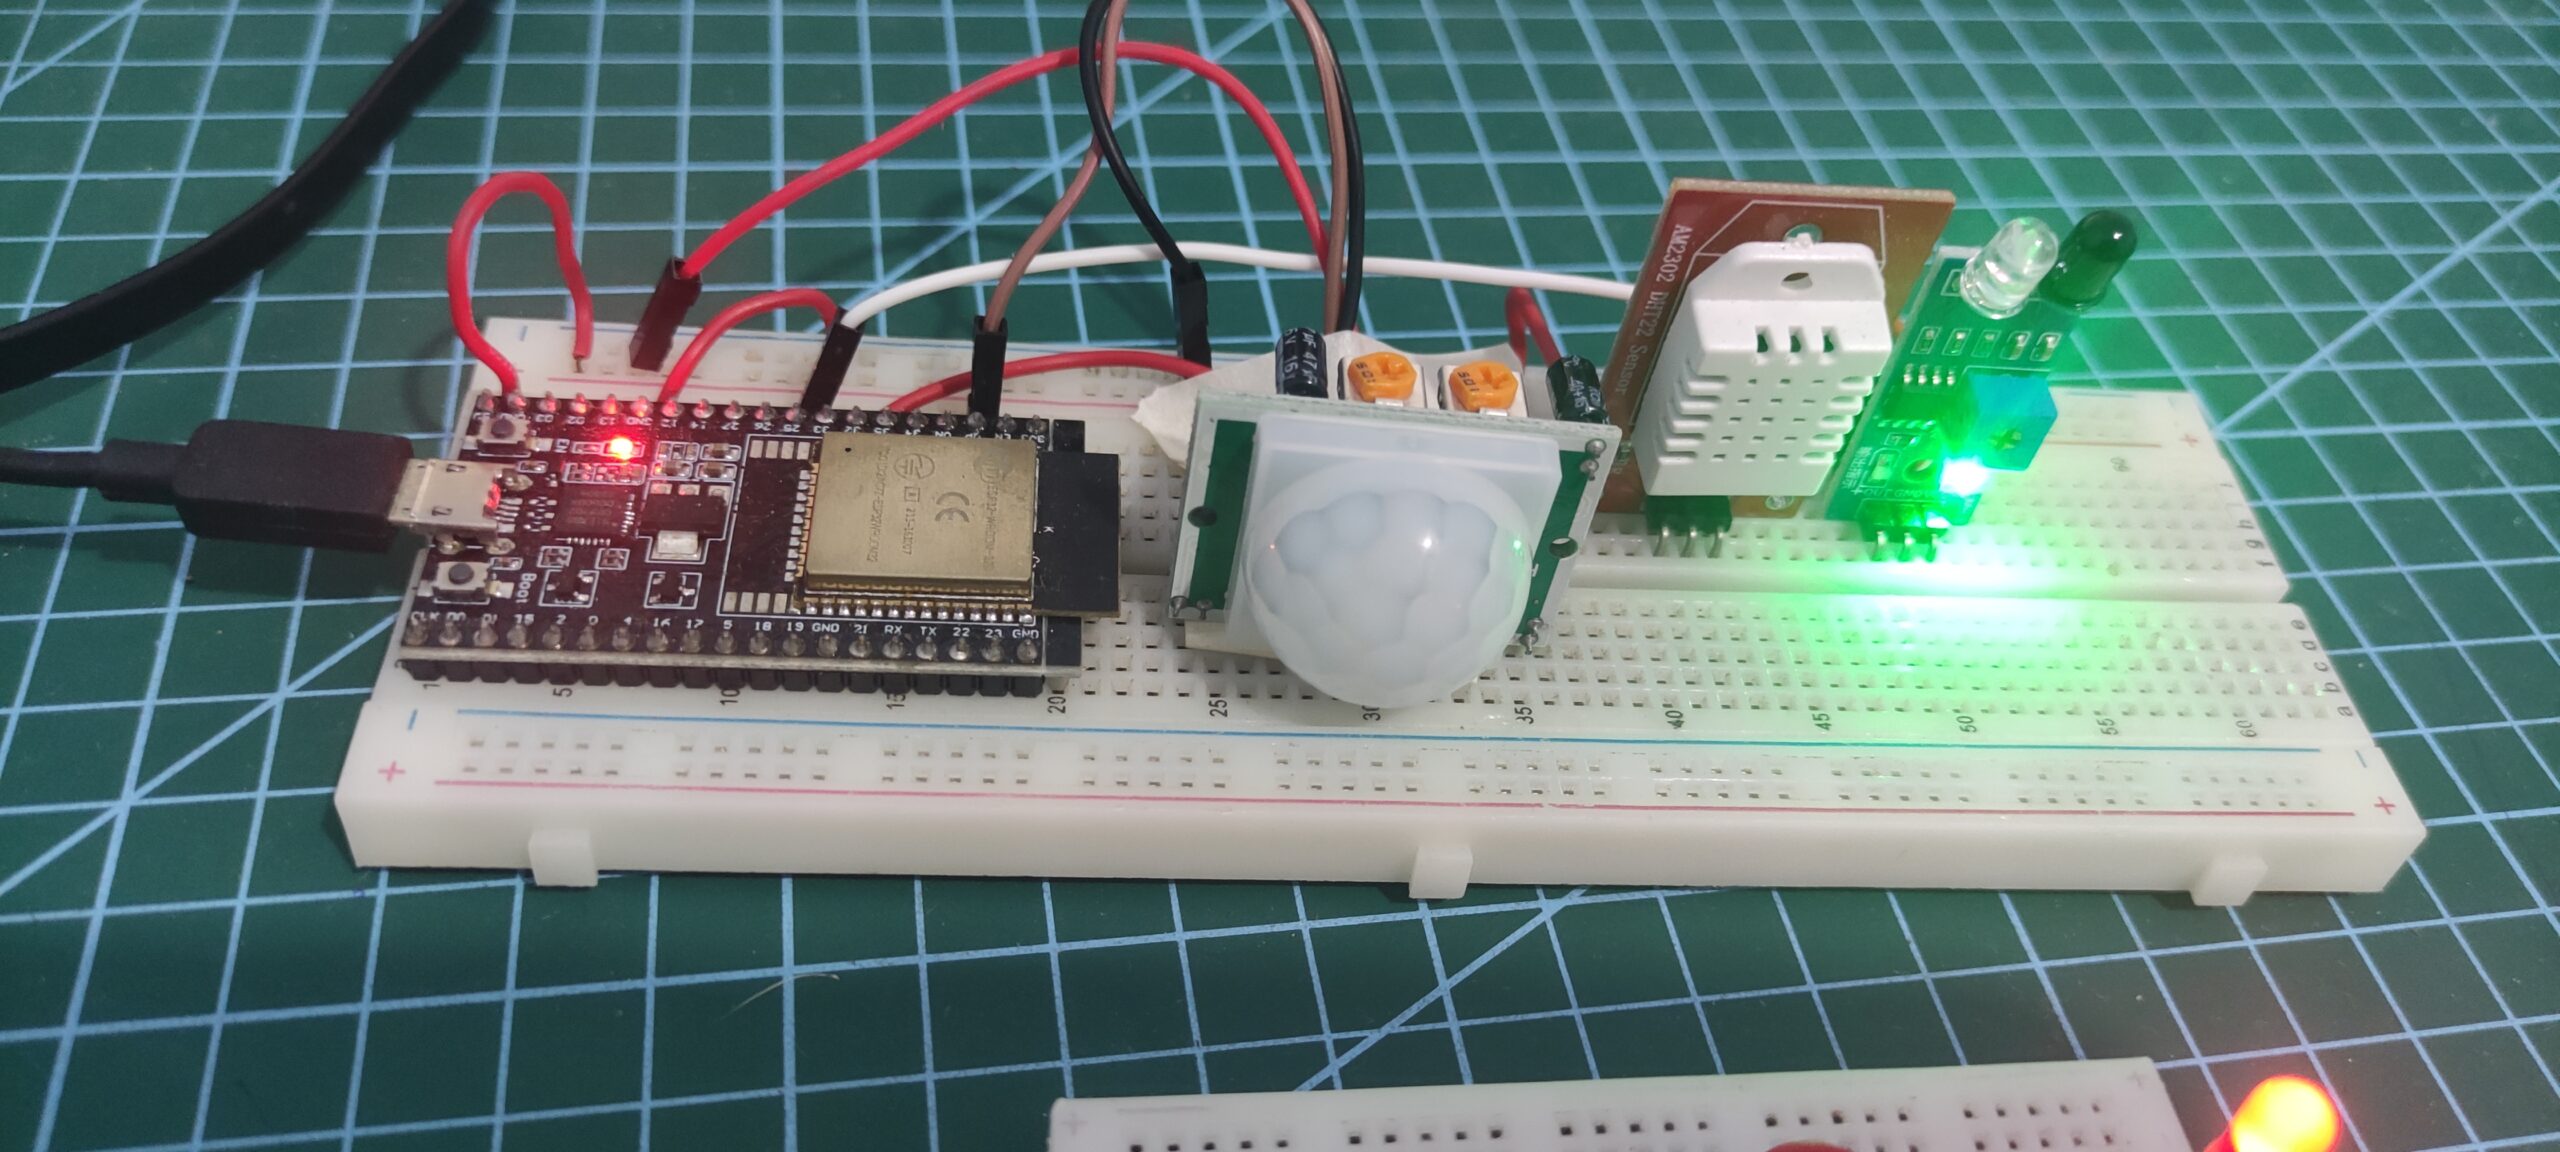
The below code is our program that will read sensor data and send it to our receiver using MicroPython and ESP-NOW.
import network
import aioespnow
import asyncio
from machine import Pin, ADC
import time
import dht
import ujson

# A WLAN interface must be active to send()/recv()
network.WLAN(network.STA_IF).active(True)

esp = aioespnow.AIOESPNow()  # Returns AIOESPNow enhanced with async support
esp.active(True)
peer = b'x!\x84\xc68\xb0'
esp.add_peer(peer)

# Define the GPIO pin to which the PIR sensor is connected (change this as needed)
pir_pin = Pin(36, Pin.IN)

# Define GPIO pin for the DHT sensor
dht_pin = Pin(32)
dht_sensor = dht.DHT22(dht_pin)

ir_pin = Pin(25, Pin.IN)

async def send_pir_motion_readings(espnow):
    while True:
        motion_detected = pir_pin.value()

        if motion_detected:
            print("Motion detected!")
            message = {"pir_alert_detected": True}
            await espnow.asend(peer, ujson.dumps(message))
        else:
#             print("No motion detected.")
            pass
        await asyncio.sleep_ms(1000)

# Async function for sending DHT temperature data
async def send_dht_temperature_data(espnow):
    while True:
        dht_sensor.measure()
        temperature = dht_sensor.temperature()
        humidity = dht_sensor.humidity()
        print(f"temperature : {temperature}, humidity: {humidity}")
        message = {"temperature":temperature}
        await espnow.asend(peer, ujson.dumps(message))
        message = {"humidity":humidity}
        await espnow.asend(peer, ujson.dumps(message))
        await asyncio.sleep(3)

async def send_ir_data(espnow):
    while True:
        # Read data from the IR sensor
        ir_data = ir_pin.value()
#         print(f"Infrared Value : {ir_data}")

        if ir_data == 0:
            print(f"Infrared Alert!")
            message = {"infrared_alert_detected": True}
            await espnow.asend(peer, ujson.dumps(message))

        await asyncio.sleep_ms(500)

async def main(espnow):
    await asyncio.gather(send_pir_motion_readings(espnow), send_dht_temperature_data(espnow), send_ir_data(espnow))


asyncio.run(main(esp))
The code above uses asyncio or asynchronous programming to be able to read multiple sensors at the same time. Let us go over what each line of code does.
import network
import aioespnow
import asyncio
from machine import Pin, ADC
import time
import dht
import ujson
First, we import the necessary MicroPython packages to talk to our sensors and the ESP-NOW modules.
# A WLAN interface must be active to send()/recv()
network.WLAN(network.STA_IF).active(True)

esp = aioespnow.AIOESPNow()  # Returns AIOESPNow enhanced with async support
esp.active(True)
peer = b'x!\x84\xc68\xb0'
esp.add_peer(peer)
Next, we define an instance of the object aioespnow.AIOESPNow() that we will use to send out ESP-NOW messages to peers that we have added to our peer-to-peer network.
# Define the GPIO pin to which the PIR sensor is connected (change this as needed)
pir_pin = Pin(36, Pin.IN)

# Define GPIO pin for the DHT sensor
dht_pin = Pin(32)
dht_sensor = dht.DHT22(dht_pin)

ir_pin = Pin(25, Pin.IN)
We defined the different GPIO (General Purpose Input Output) pins where our sensors would be connected.
async def send_pir_motion_readings(espnow):
    while True:
        motion_detected = pir_pin.value()

        if motion_detected:
            print("Motion detected!")
            message = {"pir_alert_detected": True}
            await espnow.asend(peer, ujson.dumps(message))
        else:
#             print("No motion detected.")
            pass
        await asyncio.sleep_ms(1000)

# Async function for sending DHT temperature data
async def send_dht_temperature_data(espnow):
    while True:
        dht_sensor.measure()
        temperature = dht_sensor.temperature()
        humidity = dht_sensor.humidity()
        print(f"temperature : {temperature}, humidity: {humidity}")
        message = {"temperature":temperature}
        await espnow.asend(peer, ujson.dumps(message))
        message = {"humidity":humidity}
        await espnow.asend(peer, ujson.dumps(message))
        await asyncio.sleep(3)

async def send_ir_data(espnow):
    while True:
        # Read data from the IR sensor
        ir_data = ir_pin.value()
#         print(f"Infrared Value : {ir_data}")

        if ir_data == 0:
            print(f"Infrared Alert!")
            message = {"infrared_alert_detected": True}
            await espnow.asend(peer, ujson.dumps(message))

        await asyncio.sleep_ms(500)
The three coroutines above are what we are using to read our PIR Motion sensor, Infrared, and DHT22 sensors. As you can see, it loops continuously to read the sensor data. They are declared with async keywords as we will be loading them into the MicroPython async event loop for them to run concurrently.
Also, when sending messages through ESP-NOW we should only send them in String or byte format so we need the function ujson.dumps() for conversion purposes.
async def main(espnow):
    await asyncio.gather(send_pir_motion_readings(espnow), send_dht_temperature_data(espnow), send_ir_data(espnow))


asyncio.run(main(esp))
We have loaded our coroutines into the event loop and started running the three functions concurrently.
If you have read my Basics of Micropython Asynchronous Programming thoroughly in the 2nd part of this series then you would notice that we are just using MicroPython async construct in programming this. With the code in this file, we could concurrently read and observe the sensor readings on multiple sensors and act accordingly.
async_sensor_receiver.py
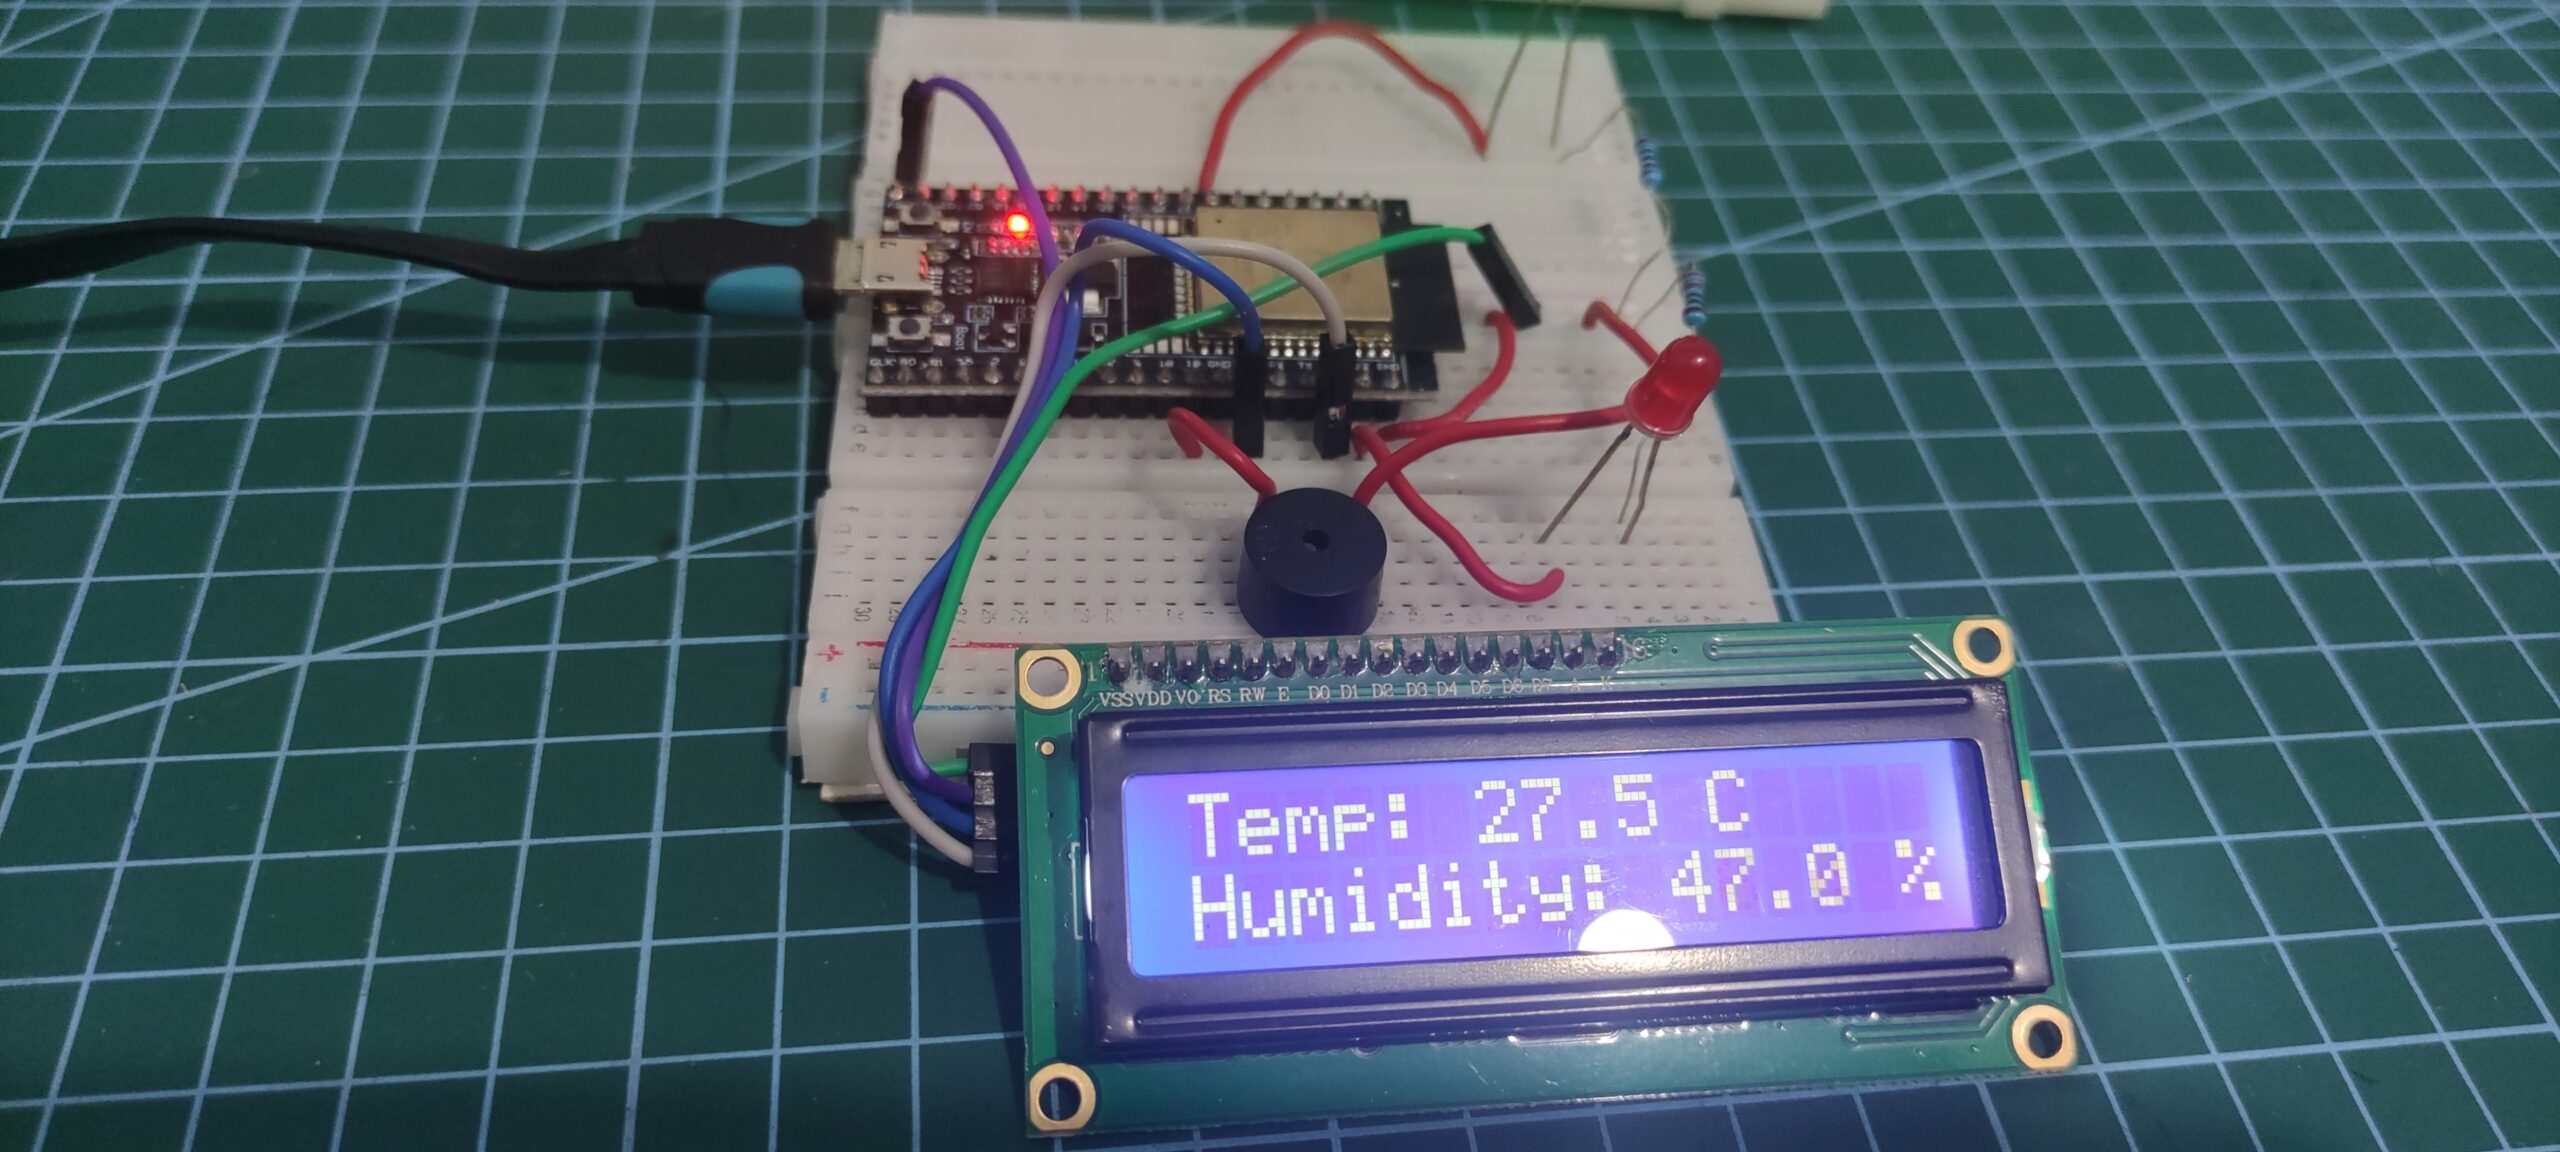
The below code is for our ESP-NOW receiver logic.
import network
import aioespnow
from machine import I2C, Pin
import asyncio
import ujson
from lcd_i2c import LCD

# A WLAN interface must be active to send()/recv()
sta = network.WLAN(network.STA_IF)  # Or network.AP_IF
sta.active(True)
sta.disconnect()      # For ESP8266

# Initialize ESP-NOW
esp = aioespnow.AIOESPNow()  # Returns AIOESPNow enhanced with async support
esp.active(True)

pir_pin = Pin(32, Pin.OUT)
infrared_pin = Pin(23, Pin.OUT)
buzzer_pin = Pin(19, Pin.OUT)

I2C_ADDR = 0x27     # DEC 39, HEX 0x27
NUM_ROWS = 2
NUM_COLS = 16

i2c = I2C(0, scl=Pin(22), sda=Pin(21), freq=10000)
lcd = LCD(addr=I2C_ADDR, cols=NUM_COLS, rows=NUM_ROWS, i2c=i2c)

lcd.begin()

async def trigger_pir_alert():
    pir_pin.on()
    await asyncio.sleep(1)
    pir_pin.off()

async def trigger_infrared_alert():
    infrared_pin.on()
    buzzer_pin.value(1)
    await asyncio.sleep(1)
    infrared_pin.off()
    buzzer_pin.value(0)

async def display_temperature(temp):
    lcd.set_cursor(col=0, row=0)
    lcd.print(f"Temp: {temp} C")

async def display_humidity(humidity):
    lcd.set_cursor(col=0, row=1)
    lcd.print(f"Humidity: {humidity} %")

async def wait_for_message():
    while True:
        _, msg = esp.recv()
        if msg:             # msg == None if timeout in recv()
            msg = ujson.loads(msg)
            print(msg)
            if "pir_alert_detected" in msg:
                await trigger_pir_alert()
            elif "infrared_alert_detected" in msg:
                await trigger_infrared_alert()
            elif "temperature"  in msg:
                await display_temperature(msg['temperature'])
            elif "humidity" in msg:
                await display_humidity(msg['humidity'])


asyncio.run(wait_for_message())
Let us go over what each line of code does.
import network
import aioespnow
from machine import I2C, Pin
import asyncio
import ujson
from lcd_i2c import LCD
As usual, we import the necessary modules needed for us to communicate with our sensor data through ESP-NOW and MicroPython.
# A WLAN interface must be active to send()/recv()
sta = network.WLAN(network.STA_IF)  # Or network.AP_IF
sta.active(True)
sta.disconnect()      # For ESP8266

# Initialize ESP-NOW
esp = aioespnow.AIOESPNow()  # Returns AIOESPNow enhanced with async support
esp.active(True)
We activate our WLAN interface and define an instance of the class aioespnow.AIOESPNow() as we will be needing it to listen to ESP-NOW messages.
pir_pin = Pin(32, Pin.OUT)
infrared_pin = Pin(23, Pin.OUT)
buzzer_pin = Pin(19, Pin.OUT)

I2C_ADDR = 0x27     # DEC 39, HEX 0x27
NUM_ROWS = 2
NUM_COLS = 16

i2c = I2C(0, scl=Pin(22), sda=Pin(21), freq=10000)
lcd = LCD(addr=I2C_ADDR, cols=NUM_COLS, rows=NUM_ROWS, i2c=i2c)

lcd.begin()
The following are the GPIO pins used in this project to drive the LEDs, buzzer, and I2C LCD connected to our receiver ESP32.
async def trigger_pir_alert():
    pir_pin.on()
    await asyncio.sleep(1)
    pir_pin.off()

async def trigger_infrared_alert():
    infrared_pin.on()
    buzzer_pin.value(1)
    await asyncio.sleep(1)
    infrared_pin.off()
    buzzer_pin.value(0)

async def display_temperature(temp):
    lcd.set_cursor(col=0, row=0)
    lcd.print(f"Temp: {temp} C")

async def display_humidity(humidity):
    lcd.set_cursor(col=0, row=1)
    lcd.print(f"Humidity: {humidity} %")
These are the coroutine functions that we will be calling to show the alert like turning on an LED, sounding the buzzer, and showing messages in our LCD.
async def wait_for_message():
    while True:
        _, msg = esp.recv()
        if msg:             # msg == None if timeout in recv()
            msg = ujson.loads(msg)
            print(msg)
            if "pir_alert_detected" in msg:
                await trigger_pir_alert()
            elif "infrared_alert_detected" in msg:
                await trigger_infrared_alert()
            elif "temperature"  in msg:
                await display_temperature(msg['temperature'])
            elif "humidity" in msg:
                await display_humidity(msg['humidity'])


asyncio.run(wait_for_message())
This is the function that continually listens for any ESP-NOW messages. ESP-NOW messages are usually in String or Byte format when sent so we need to convert it to a JSON format. We then parse the message and check what type of message was sent and whatever it is then we call the coroutine functions that we have declared earlier.
We run the same function in a Python event loop.
With that said, I have shown you the logic of our program and how easy it is to send sensor data through ESP-NOW and MicroPython.
How to run and test the project?
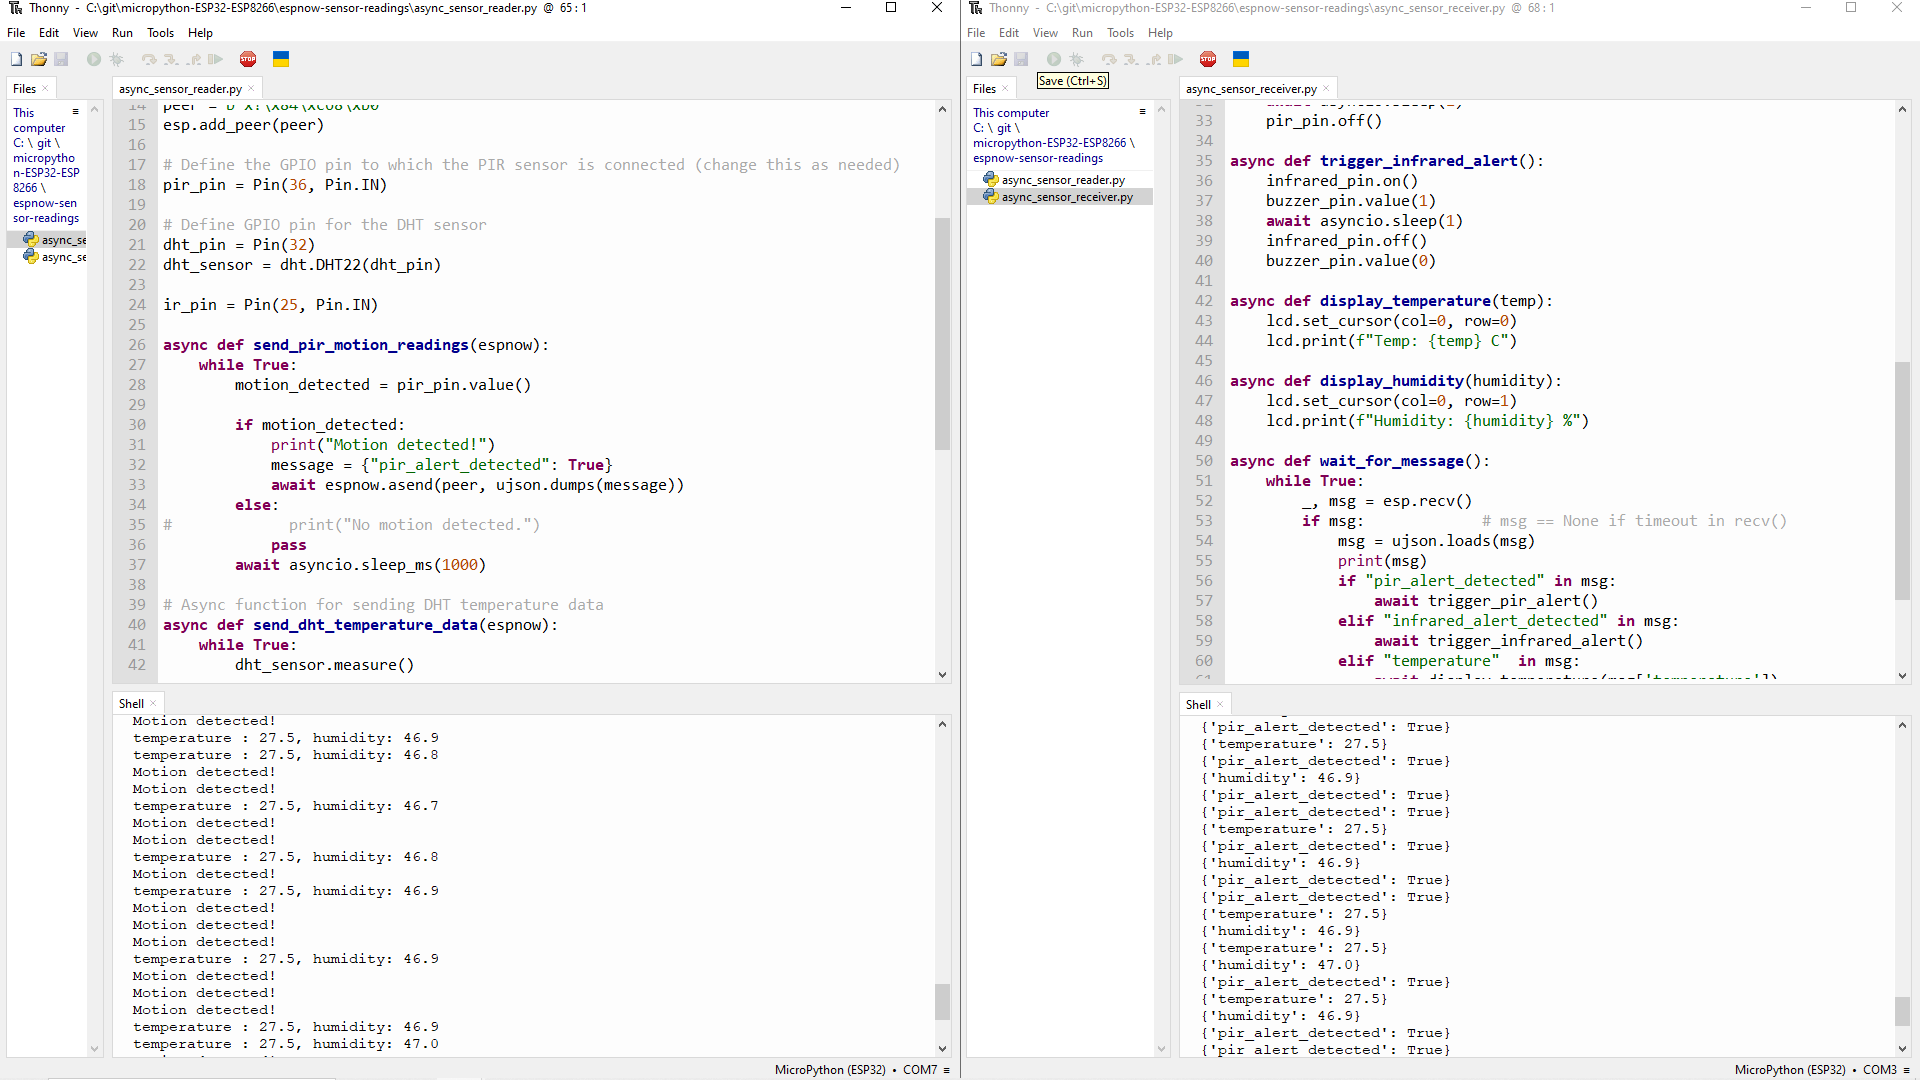
In order for you to run and test the project, you need to run Thonny in multiple instances. You can refer to my earlier post about How do you run Thonny IDE with multiple windows or instances.
Open both async_sensor_reader.py and async_sensor_receiver.py side by side and click run. You should be seeing the ESP-NOW messages being exchanged between the two projects.
Wrap up
A powerful talent that can take your IoT and sensor-based applications to new heights is the ability to master delivering sensor data through ESP-NOW in MicroPython. We’ve gone into the nuances of hardware setup, data collecting, and practical applications throughout this tutorial. Utilizing ESP-NOW’s capabilities and MicroPython’s flexibility, you may build effective, quick, and integrated systems for home automation, sensor networks, and remote monitoring. Remember that the options are endless and that the only restriction is your imagination as you set out on your voyage of sensor data transmission. As you establish yourself in the IoT and embedded systems industries, explore, experiment, and keep innovating.
I hope you have learned something. Happy Exploring!
Support Me!
I love sharing what I know and hopefully, I was able to help you. Writing helpful content takes so much time and research. If you think you like my work and I have managed to help you then please consider supporting my channel. I would be very grateful and would boost my confidence that what I am doing is making a big change in the world. (No Pun Intended!) 😉
Become a Patron!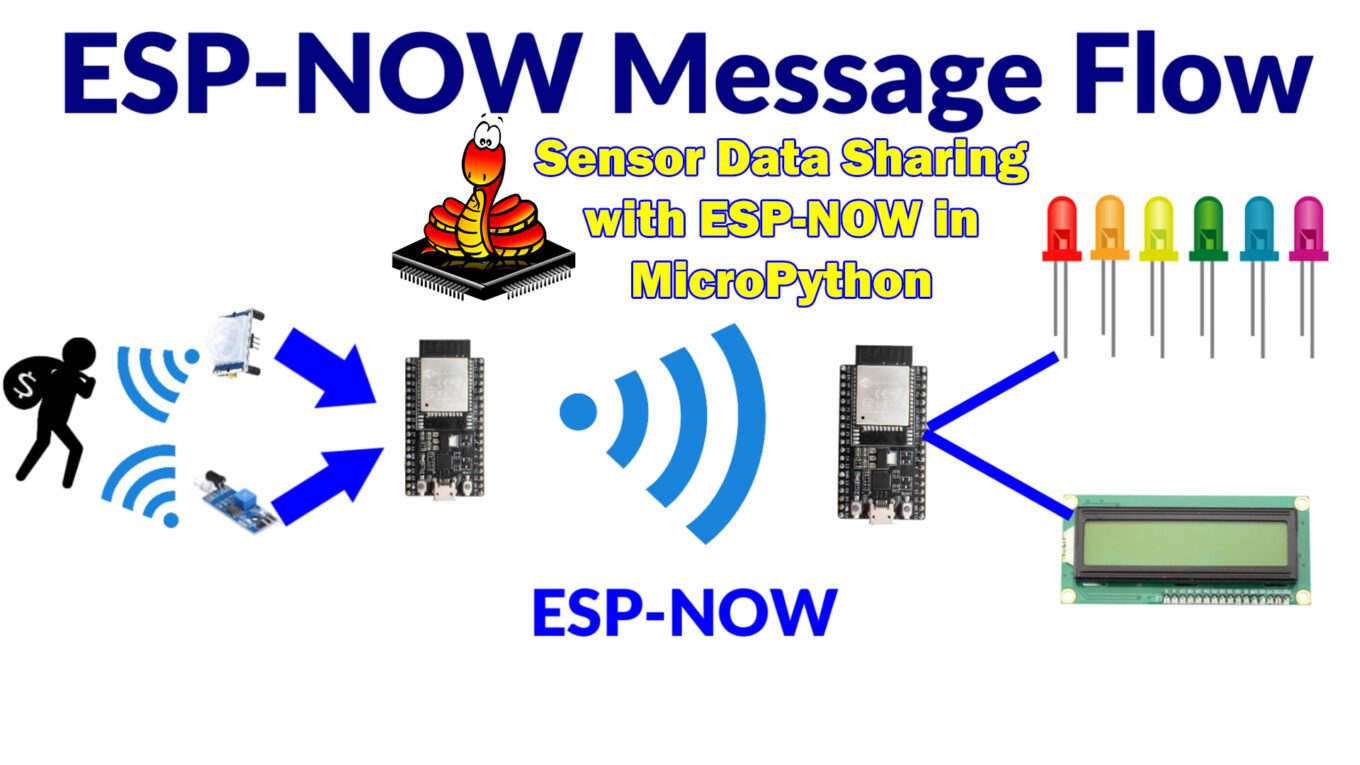
Leave a Reply